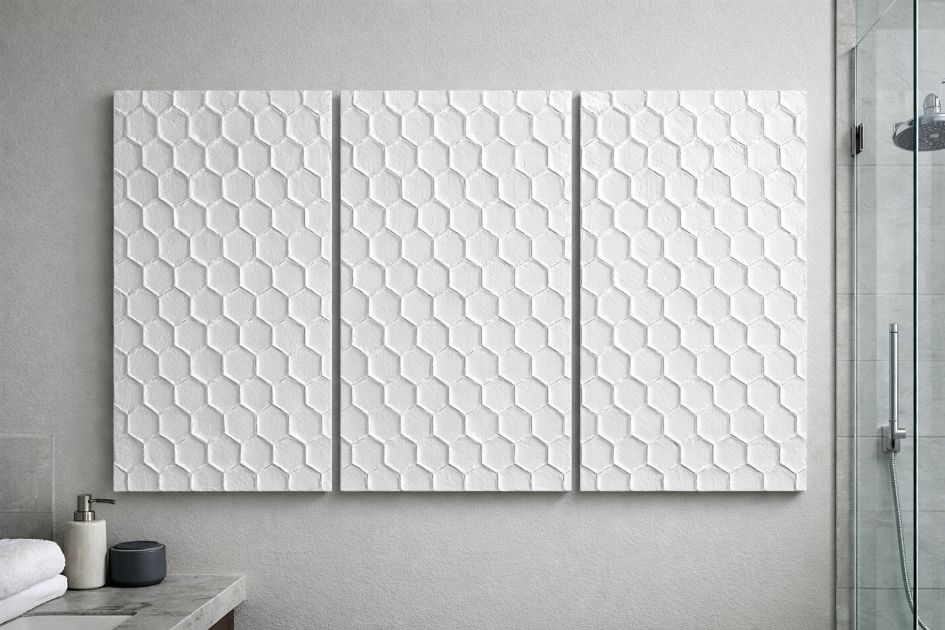
Transform your bathroom into a modern art space with this unique DIY project. By using plastic bubble wrap and plaster, you can create a stunning textured piece of wall art that mimics a geometric honeycomb pattern. This project is not only affordable and easy to execute, but it also adds a touch of elegance and sophistication to your home decor. The tactile texture and modernist design make it a perfect statement piece for any bathroom.
Hang the finished wall art above a bathtub or on a feature wall to create a focal point in the bathroom. Pair it with minimalist fixtures, such as a sleek chrome faucet and neutral-toned towels, to enhance its modern aesthetic. Coordinate the color scheme with other decor elements like a monochrome rug or a few potted plants for a serene, cohesive look.
Textured Modernist Wall Art with Plaster and Bubble Wrap
Materials
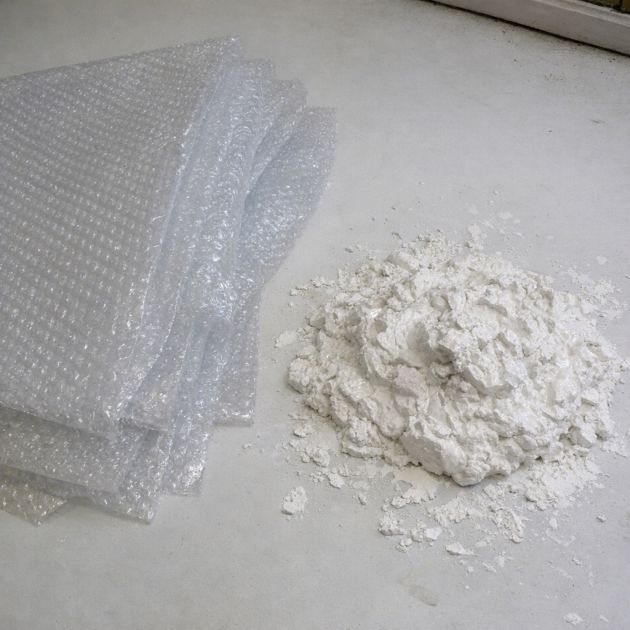
3 large sheets of plastic bubble wrap (24 x 36 inches each)
1 bucket of white plaster (about 10 lbs)
1 plaster spatula or trowel
1 roll of painter's tape
1 drop cloth
1 measuring tape
Hanging hardware (e.g., picture hooks or adhesive strips)
Directions
Lay the drop cloth on a flat surface to protect the area. Place the three bubble wrap sheets side by side, flat and bubble side up.
Use the measuring tape to ensure that the bubble wrap sheets are aligned and evenly spaced.
Secure the edges of the bubble wrap sheets to the drop cloth using painter's tape to prevent them from moving.
Mix the white plaster in accordance with the manufacturer's instructions until it reaches a smooth, spreadable consistency.
Using the plaster spatula or trowel, smear a generous layer of wet white plaster evenly over the surface of the bubble wrap sheets, ensuring full coverage.
Allow the plaster to partially dry until it is firm but still flexible. This typically takes about 20 to 30 minutes, depending on humidity and temperature.
Carefully peel the plaster-coated sheets off the bubble wrap, revealing the textured honeycomb pattern on the plaster surface.
Once fully dried and hardened, trim any uneven edges for a clean finish.
Attach the hanging hardware to the back of the plaster sheets and mount them on your desired wall space.
Variations & Tips
For a more colorful variation, consider adding pigment to the plaster before application to create a custom hue that complements your bathroom's color scheme. Alternatively, after the plaster has dried, you could paint the honeycomb pattern with a metallic finish for a luxurious touch. You could also experiment with different sizes of bubble wrap to create varying pattern scales, adding depth and interest to the piece.